Showing posts with label kids. Show all posts

Friday, April 27, 2012

sketch support | easter


It’s one-page week at Sketch Support again. Head on over there to get a free copy of this week’s sketch & check out what the rest of the creative team came up with.


07-easter

Supplies – patterned paper: Crate Paper, Jillibean Soup; embellishments: Jillibean Soup; ink: Tsukinenko

Variation #1: I changed the size of the 4x6 photo to so I could use my square Instagram photo.

Variation #2: I enlarged the journaling block area so I could include the bottom 3/4 of 3”x4” journaling tag from Jillibean Soup.

07-easter-2

Variation #3: I didn’t use any hearts…I used a few different punch-outs from Jillibean layered with stickers to accent my photos.

07-easter-1

07-easter-3

Friday, March 30, 2012

sketch support | awesome

It’s one-page week at Sketch Support again. Head on over there to get a free copy of this week’s sketch & check out what the rest of the creative team came up with.

I decided to use a picture taken of my son on his 7th birthday and incorporate an interview with him for my journaling. I used the same questions for him on his 6th birthday (and on Olivia’s 5th last year too). The questions came from Cathy Zielske’s Story Guide Layered Template #1 available here.

04-awesome

Supplies – patterned paper: October Afternoon, Echo Park, Sweet Caroline by My Mind’s Eye, Cosmo Cricket; epoxy paper clip: Sweet Caroline by My Mind’s Eye; letters: Thickers by American Crafts, Authentique; chipboard accents: Bella Blvd; label sticker: Cosmo Cricket; interview questions: from Cathy Zielske’s Story Guide Layered Template #1; ink: Tsukineko; other: embroidery floss

Since you can’t read what he said too well, I thought I’d include his “awesome” answers:

My favorite food is: sushi
My favorite sport to play is: soccer.
The best show on television is: Beyblade Metal Masters.
The coolest person on Earth is: Jack.
My best subject in school is: playing tetherball.
The thing I do the most awesomely is: Bakugan battles.
If I could change my name, it would be: Monsoono.
If I could go anywhere in the world, I’d go to: China.
My favorite color is: green.
When I grow up, I’m going to become a: I don’t know.
The thing my parents are too strict about is: cleaning up my room & not letting me watch shows on TV that I want to watch.
My current favorite band is: LMFAO (I’m Sexy & I Know It).
The last book I read was: Bakugan Ultimate Handbook.
Three words that describe me are: good friend, funny, smart.
When I was little, I used to: ride my bike around the block with my dad.
My favorite season of the year is: summer.
The snack I could live on is: Gushers.
The food that makes me want to puke is: yogurt.
My best friend is: Jack Hutchison.
If I had one wish it would be: to have a whole bunch of toys.
My best memory is: riding CA “SCREAMIN’” with my mom.

Variation #1 – I didn’t use anywhere near as many embellishments! I wanted this layout to be a bit more “clean & simple” since it’s about my son…not that a layout about a boy can’t have embellishments, but I really liked how it looked without much extra.04-awesome-1

Variation #2 – I used a few label & word stickers, plus a “7” (since this is when Brandon turned seven) in place of the flower/button embellishments.04-awesome-2

Friday, February 24, 2012

sketch support | bailey


It’s one page sketch week over at Sketch Support. Head on over there to check out this week’s sketch & what the rest of the Creative Team has come up with.

Here’s my take:

17-bailey

Supplies – patterned paper: Bo Bunny, My Mind’s Eye, Bella Blvd; buttons: Basic Grey; corrugated letters: Jillibean Soup; word stickers: Authentique; ink:Tsukineko; other: embroidery floss

As soon as I saw the large heart I knew I wanted to make this layout. I’ve had these photos for over three years, and the idea for almost six. Bailey was a special dog & needed a special layout.

First of all, to get the large heart (& small hearts since I don’t own a heart punch), I went into PSE & drew some hearts. Then I made a few tweaks to the design:

17-bailey-1

Variation #1: I used buttons instead of the smallest hearts. I wanted this layout to be about how much my kids love my parents' dog, but not overly "lovey" with tons of hearts. Bailey was a boy, after all, lol!

17-bailey-2

Variation #2: I omitted the stitching and some of the hearts at the bottom. I ended up liking how it looked just like this (even though I had cut out other hearts & had more buttons). Once I added the word stickers it just felt done.

Monday, September 26, 2011

sketch support | 1st day of school


Layout 1

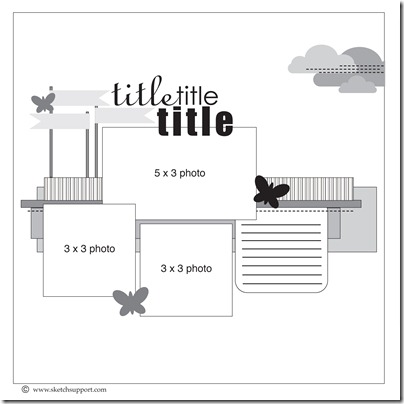
You can download and print this sketch (and others!) by going to Sketch Support and clicking on the one-page sketches link found under the "printable sketches" tab on the right sidebar.

45-first-day

supplies: letter stickers: American Crafts, Basic Grey; word stickers: October Afternoon; patterned paper: My Mind’s Eye, Crate Paper, Graphic 45, Cosmo Cricket, October Afternoon, Sassafras; pearls: Prima; punches: Martha Stewart, Fiskars; ink: Tsukineko

1) I followed the sketch pretty closely. I kept all of the paper dimensions the same. I did enlarge the main photo to  3-1/2”x 5” because it just worked better for my photo.

45-first-day-3

2) I omitted the stitching on the clouds & used some fun word stickers in my stash instead. I think it has the same effect and adds a little extra to this spot.

45-first-day-2

3) I also omitted the row of stitching along the patterned paper strips. I used some really busy papers, and the stitching would have been overkill.

45-first-day-1

4) And I used a bit of inking on the flags & flagpoles to help them stand out a bit more.

Wednesday, June 22, 2011

just another friday night


I think this just might be one of my favorite layouts right now:

35-friday-night

Supplies (all May Green Tangerines Kit Club): Letter stickers Bella Blvd; Patterned paper: My Mind’s Eye, Crate Paper, October Afternoon, Pink Paislee; Jute Flowers: Jillibean Soup; ric rac, twine, embroidery floss (2 strands for stitching)

It’s based on the double page sketch #16 from Sketch Support.

After printing my photos in black & white, I knew they needed to lay on a white background. And I wanted LOTS of color in the patchwork below. So I pulled out my kraft cardstock and my May GTKC.  Then I just started laying all the papers next to each other until I figured out which ones worked best on this layout.

35-friday-night-2

(yes, I noticed AFTER I took this photo that my lettering was coming up…thanks to a little glue & a page protector it’s A-OK now!)

The sketch calls for stitching. I didn’t want the fine line from my sewing machine, so I knew I’d be hand stitching. I just go the Sew Easy tool & it was so fun to use on here! It didn’t go thru all three layers of paper, but that’s okay. It did give me a partial hole that I just poked thru with my paper piercer.

35-friday-night-1


I didn’t want to get my layout too flowery, since the main photo is my son and his best friend, but my kit had these cool jute flowers from Jillibean that I’ve been dying to use. I think they added the right touch without being too girly.

35-friday-night-4


This banner here was one of the embellishments from my kit. The sketch had clouds over here, which didn’t really “fit” my layout. But I think the banner adds just the right amount of color without being over the top.

35-friday-night-3

Thursday, May 26, 2011

sunny days

A few weeks ago I grabbed my camera when we went to the park, and I had fun snapping some fun pictures of the girls while we were waiting for their brother to get out of school.

24-sunny-days

I was inspired by a sketch that came with my April GTKC, and I lifted the circle idea from Brenda Johnston’s layout based on the sketch. I printed an 11 1/2” circle from Photoshop Elements onto the back of the patterned paper so I had a line to cut my circle.

I knew I wanted to incorporate yellow into the layout because of Olivia’s bright top. And then I found this fun cloud paper from My Mind’s Eye (the reverse is the yellow print on the cloud).

24-sunny-days-4

After adhering the photos & paper, I wanted to add some embellishments. I had two “blank” areas (the upper right and down by the title) that needed some attention. I just got myself the cute cloud punch last week, and this was the perfect time to break it in! I love how Susan Weinroth stitches her clouds onto her layouts, so I pulled out my new sewing machine too.

24-sunny-days-3

I used a single line of stitching on my upper clouds and three separate lines on my lower clouds.  I didn’t stitch on the clouds near my journaling because I thought it would just be too much there.

24-sunny-days-2

Thursday, January 13, 2011

wish

Last year we started the Christmas wish list tradition with Brandon & Olivia. Since they couldn’t write, my mom helped them cut out pictures from the toy ads that come out in November. We put them in page protectors & they brought them when they visited Santa.
This year they still can’t write, but they can cut on their own. So I collected a bunch of toy ads for them, handed them some scissors, paper, & glue sticks, and let them go to town. I think it took all afternoon!

50-wish

This layout is based on a Page Maps sketch found here. I didn’t get a layout done in time for the contest, but liked the sketch anyway (and had already printed the photos).
I used some Jillibean Soup (speaking of which, have you been to their blog this week? New spring lines are up! *LOVE* them!), along with some new goodies in my January Green Tangerines Kit.

50-wish-1

Unfortunately you can see the number on this journaling sprout because I took a photo from the top of the page (so you wouldn’t see my ugly carpet!). But normally you don’t see it. I popped the flower up & added a “dot” from my letter stickers. I don’t remember where I saw that idea; using your extra dots from your thickers stash instead of buying brads, but I love it!

50-wish-2

I drew my journaling lines again on this layout…why haven’t I done this before? So easy!

Friday, November 19, 2010

flashback friday...fall 2007

Our little monkeys playing in the leaves.

Sunday, November 7, 2010

rub a dub dub

three kids in a tub

11-07-10_0013_edited-1

Saturday, May 29, 2010

just ride

Last fall our neighbors across the street gave us their old bikes, which was so awesome! We didn't really want to buy the kids bikes for Christmas since they probably wouldn't be able to ride them much during the winter. Although these were a bit on the small side, they were perfect until their birthdays.

I used the August kit from Green Tangerines on this layout. I've been waiting to use the Hambly Screen bike transparency for a while...I just hadn't quite figured out how I wanted my overall layout to look until recently. The layout is based on a sketch by Alison Davis, in her sketch book #5.


I used up the last of the diagonal stripe paper from my kit. I barely had enough left! I had planned on using red glitter thickers on this title tag. I have two sheets of it; one from the kit & one I had purchased last Fourth of July. Of those two packages, I didn't have any T, R, or E. So...plan B! Fortunately I *love* how it looks with the blue (also purchased last Fourth of July). And even though I wanted red on the tag, I think the font of the blue letters works better overall.


Thursday, May 20, 2010

something to be thankful for!


It's been a while since I've posted a layout :)

Between my non-stop photo madness during the week in my life and life in general, scrapbooking sometimes gets put on the back burner. Fortunately, last Sunday I had some free moments, thanks to Beauty & the Beast :)  It just took a few days to share...I was being lazy & didn't feel like changing lenses on my camera so I used my point & shoot. Which is a GREAT camera, but I couldn't get enough light without the flash. At least I got a photo finally!

I completed this layout of Easter using a sketch from Allison Davis' sketch book #4. The paper & woolies are from Basic Grey's Kioshi line. I think it's a very soft & springy line. I got a few extra sheets to cover some paper mache' letters at some point too.


I love how there's just a touch of bling in the woolie dragonfly. I used some thickers I had in my stash from the December GT kit.


I wasn't sure what I wanted to do for my journaling. The sketch does show strips of paper here, but I couldn't figure out what color to do. Then I remembered how Kristen has done a lot with tone on tone journaling strips, & it always looks great!

Saturday, March 20, 2010

February Kit, part 2

More fun layouts from my Green Tangerines February kit:

Brandon & Olivia are 14 months apart. Actually 13 months & 3 weeks, but who's counting, right? They've shared a room since the day she came home from the hospital, and because Brandon was so young when she was born, he hasn't ever know her not to be around. I've been wanting to create a layout about this for quite some time, and I finally was inspired to get one done.

I used this layout design about a year ago, when I did a photo a day for January. I really like how I could fit in a ton of photos of the kids together & still fit in bits of patterened paper. And I love how the zig-zag  pattern on the paper makes it look so different in each spot I used it.


I had fun adding some bling to the seam between the two papers.

And my favorite part: cute little handmade flowers! I punched out two circles for each flower, using one sheet of double sided paper. The smaller circle is 3/4" & the larger one is 1-1/4". After I punched them I crinkled them up & put a brad in it. It was so easy! I will totally be using this idea again!

But not on this next layout, LOL, it's of my son :) Being a pirate with my mom's swiffer duster. Oh yeah, he's cool. I know the photo is dark, but I was so thrilled to get it because it is so him right now. Lately, he'll grab his pirate hat & that "sword" & then go around telling my mom & I what to do. We have to say, "yes pirate" or go on time out.

I had so much fun doing this layout. I really had some creative mojo going on!

We all got some plain metal clips in the kit. One of mine was already tricked out by my friend Brenda, who is on the design team at Green Tangerines. She punched a circle out of the patterened paper, glued it to the inner (solid) circle on the clip, and then added some glossy accents to give it that faux epoxy look.

I can be a bit OCD when it comes to my scrapbook layouts, so I had to used three embellishments on this page. I used her clip, plus I made two more. Super easy, and just the right touch. I only wish I had more! On the clip below I also added a "b" letter sticker for Brandon. And I added some of the glossy accents to the letter stickers in the title to puff them up a bit. I need to do that more often.


Lastly, on this layout I added some fun word stickers that were in the kit too. I really like how they're not all the same font & size. It makes it look like I cut them out of a magazine, like a project I used to have to do in elementary school.

Monday...some cards...

Friday, March 19, 2010

Green Tangerines Kit Club & February layouts, part 1

Have you heard about it?

I've been a subscriber for the last few months, and an admirer before that. I love how someone else has done the dirty work & figured out what papers go together (so I don't have to buy a whole line! score!). And then they've added a bunch of other fun goodies to those papers. Even better!

Recently I was asked to be a guest designer for the February kit! I was beyond thrilled! I had so much fun creating a bunch of layouts from this kit.


I *love* these label stickers from October Afternoon! They add such a neat little extra touch for journaling. Honestly, I used to only do journaling on the computer & I've been converted to handwriting because of these cute labels. :)

I am such a sucker for letter stickers! Any color, any size, any shape...I'll use them all :)


I had fun doing this layout. I was so thankful that we had some awesome weather in mid-February! I brought the kids up to the park specifically to take some pictures so I could scrap them :) I added a grunge edge to the photos in photoshop elements before printing them and used a fun sketch I found on Alison Davis's blog.


I used another one of Alison's sketches on this layout. I've been a diehard sketch user for a LONG time!

I inked the outside of each of these circles to give them a little oomph, and to tie them in with the label stickers. I love mixing up prints like this.

And yes, that is real wood there! How awesome! When I found out I was going to use real wood on a layout I thought I'd use it on something more "natural". But then I got these photos back of my kids playing in a cardboard box & knew it would be best here.

A suggestion for using the wood paper: lots of adhesive! It has a natural "curl" to it, which will flatten out, but adhesive will help. I used that sticky tape (yes, I will admit, I have watched a too much Dora the Explorer) that has the red backing on it. I've seen it at Michaels & Stampin' Up.


I have a lot more layouts I did with this kit. I'll share more of those tomorrow...

You can see all of my layouts & those from all the regular designers at the Green Tangerine's Flikr Gallery.